Harmonic And Jazzy Tutorial
Build the RobotController
Introduction and explanation
What software are we using and why
All of these instructions have been tested using the current version of Ubuntu: Noble Numbat.We are going to use two packages: Gazebo for the physics based Simulator and ROS2 (Robot Operating System) for the control system. There are many releases of each of these, and only some combinations are mutually compatible. Also, since we are focusing on a stable development platform, we will use the Long Term Support (LTS) versions that are current at the time we are posting this. As of 29Aug2024, this means we will use Gazebo Harmonic which is supported until 2028.
How will the demonstration proceed.We will go through 7 steps: 1) Install Gazebo Fortress and confirm that it is correct.
2) Examine an empty world
3) Build a simple robot and test it using keyboard controls. 4) Build a 'world' for our robot to explore. 5) Install ROS2 (and its components) and confirm the installation. 6) Add Lidar to the robot
7) Write control software in ROS2 to make the robot autonomous.
This post covers Step 7 Starting world description (from the last tutorial): hjn-pong-world-4.sdf If you want the controller code it is here
This post covers Step 7 Starting world description (from the last tutorial): hjn-pong-world-4.sdf If you want the controller code it is here
Building a new Package - What's that mean?
The Robot Operating System provides (among other things) communication channels between independent components. As we saw in the last tutorial, one form of these communication channels uses topics to link publishers and subscribers - the published pushes messages out onto the topic and the subscriber reads those messages. So, the question then is how does a program tell ROS2 that it is interested in a topic to either read or write to it?
ROS2 knows about Gazebo and can set up bridges between ROS2 and Gazebo, we did that with the built inbridge functionality. But what about a chunk of custom code that we want to use, how do we tell ROS2 about that?
ROS2 provides a process to buils and register external software. This can be in almost any language (provided there is a wrapper available), but one of the simplest is to use Python.
So there are a couple of steps needed:
1) Use ROS2 to build a workspace for your new package
a) the workspace needs to be setup just right, so we use a ROS2 built in command
2) Update some configuration files to let ROS2 know what your code is going to need
3) Write some code to do something useful and put it in the package source directory
4) Run a program called Colcon - which will pull all the information together and setup the wrappers needed by ROS2
5) Set up the environment and run the code.
In this tutorial, we will go through each of these steps and produce an obstacle avoidance controller for our robot.
Let's get started.
Set up a Workspace
We generally want to do each project in a unique workspace.
So, since we are going to build an obstacle avoidance controller for our robot in using ROS2, let's call the workspace ros2_avoider
and then cd into the workspace.
> mkdir -p ~/ros2_avoider/src
> cd ~/ros2_avoider/src
This is the root of your workspace, a number of the commands will need to be launched from this directory.
The next step is to use a ros tool to set up the needed files and directories for building a package in your workspace.
Don't forget to source the ROS2 setup script!
From the src directory:
> source /opt/ros/jazzy/setup.bash
> ros2 pkg create --build-type ament_python --license Apache-2.0 py_avoider
Let's look at this in parts:
ros2 - invokes the ros2 program
pkg create : tells ros2 you want to build a package
--build-type ament_python : tells ros2 what kind of code you will be using - in this case python
--license Apache-2.0 : tells ros2 what license type you want included in the code (there are several options)
py_avoider : tells ros2 what to name the package.
When you run it, you will be told that it completed creating everything, and give you feedback on extra steps.
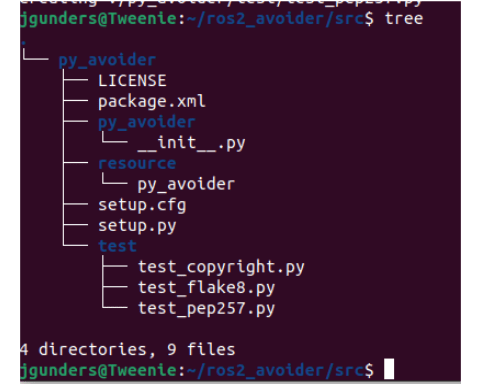
What ros sets up is a ros2 wrapper around a python package, so you will end up with a directory tree like:
So at this point the basics are set up.
Now we need some python code for obstacle avoidance, that is ready to work with ROS2.
This sample was stolen from a great tutorial by Kabilankb - an Nvidia Ambassador, and can be found at
Building a Simple ROS2 Object Avoidance Robot using Python
He goes into a great analysis of the code.
The code is straight forward
Monitor the /scan topic
If the closest return is less that 1.5m (safe_distance) turn counter-clockwise
otherwise, go straight
We send the commands as Twist messages on the /cmd_vel topic.
Recall that the original robot code (way back in part 3) monitored the cmd_vel topic and fed the info into the differential drive plugin.
We modified the original code by changing the safe_distance to 1.5m and increasing the forward speed to 1m/s
Below is the complete code for the Avoider - you can download a copy here: avoidance.py
Put this code into ~/ros2_avoider/src/py_avoider/py_avoider/
It should go along side the __init__.py file
We need to focus on just a few pieces of the code, all of these are found in the ~/ros2_avoider/src/py_avoider directory.
First and foremost we need to know what this code depends on, these are in the imports and need to be listed in package.xml.
Second, we need to tell the builder what we want to be invoked when the package is run - in this case it is pretty simple, run main(), this is done in setup.py.
Third, we need to confirm that the builder will put the executables in the right place, this is done in setup.cfg
So, let's get busy.
package.xml
In this file, find the todos (in bold) and update them
then add the dependencies labeled <exec_depend> (also in bold)
That will tell the build system to make sure they are included.
<?xml version="1.0"?><?xml-model href="http://download.ros.org/schema/package_format3.xsd" schematypens="http://www.w3.org/2001/XMLSchema"?><package format="3"> <name>py_avoider</name> <version>0.0.0</version> <description>This is a simple obstacle avoidance program</description> <maintainer email="yourmail@yourdomain.com">jgunders</maintainer> <license>Apache-2.0</license>
<exec_depend>rclpy</exec_depend>
<exec_depend>sensor_msgs</exec_depend>
<exec_depend>geometry_msgs</exec_depend>
<test_depend>ament_copyright</test_depend> <test_depend>ament_flake8</test_depend> <test_depend>ament_pep257</test_depend> <test_depend>python3-pytest</test_depend>
<export> <build_type>ament_python</build_type> </export></package>
<export> <build_type>ament_python</build_type> </export></package>
setup.py
In this one, update todos (maintainer, email, etc - in bold)
and add the line to the entry_points section, inside console_scripts
This tells the builder, "Hey, builder, when I want this thing I amd going to use m'avoider' on the command line - you need to go find py_avoider.ObjectAvoidanceNode and call its main function.
from setuptools import find_packages, setuppackage_name = 'py_avoider'setup( name=package_name, version='0.0.0', packages=find_packages(exclude=['test']), data_files=[ ('share/ament_index/resource_index/packages', ['resource/' + package_name]), ('share/' + package_name, ['package.xml']), ], install_requires=['setuptools'], zip_safe=True, maintainer='jgunders', maintainer_email='your email@your.domain', description='This is a simple obstacle avoider', license='Apache-2.0', tests_require=['pytest'], entry_points={ 'console_scripts': [
'avoider = py_avoider.avoidance:main', ], },)
setup.cfg
In this one, just make sure that the executables go into the lib directory:
[develop]script_dir=$base/lib/py_avoider[install]install_scripts=$base/lib/py_avoider
One last step before we build
So now that everything is all set up, there is just one more potential gotcha: your code may require a dependency that did not get loaded with the default ros2 install.
But don't worry, ros2 has a solution: rosdep
Get in the habit of running rosdep anytime you build new code or significantly change the code , it will check all the setup files for errors and then load any missing dependencies.
AS WITH MANY ROS COMMANDS, RUN IT FROM THE ROOT OF YOUR WORKSPACE!
> rosdep install -i --from-path src --rosdistro jazzy -y
The rosdep tells the system to run the rosdep program
install tells rosdep to catalog all the dependencies and install any that are missing
the -i is a mystery
--from-path tells rosdep where the source code and configuration files are
--rosdistro tells rosdep which version of ros to pull from
and the -y says "don't ask, just do it"
Time to build the package
At this point, everything is ready to build the new package.
To do that we use the colcon program we installed along with ros.
Colcon is pretty straight forward :
> colcon build --packages-select py_avoider
This has gathered all the dependencies, built the ROS2 wrapper for the python code and setup all the needed software to monitor and write to topics.
Now ROS2 knows about your custom software and can put it to work.
Let's run it!
To run the code we need to construct the ecosystem in ros
We will need 4 things:
1) The simulator running with out world and robot model
2) A gz_ros bridge to translate the Gazebo lidar data into ros lidar data and publish it under ros
3) The new robot controller software that will read the ros lidar data and publish ros Twist messages to control the robot
4) A gz_ros bridge that will read the ros Twist messages, translate them into Gazebo Twist messages, and publish them to the simulator
The simplest way to do this is to run each of these in a separate terminal window and source the ros setup files in each
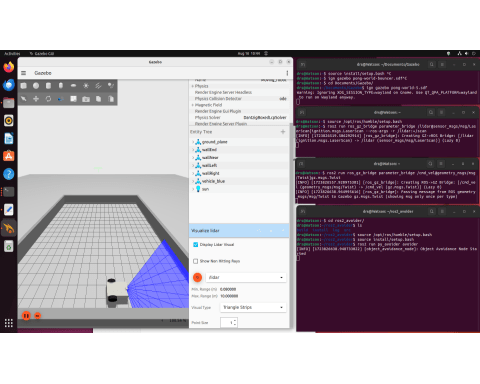
Terminal 1: Run the Gazebo Simulator
> source /opt/ros/jazzy/setup.bash
> gz sim hjn-pong-world-4.sdf
Once the sim is up and running, you can activate the 'visualize lidar' component just like before.
Terminal 2: the Lidar data bridge from Gazebo to Ros
Notice that we remap the topic it is /lidar on the Gazebo side, but it is /scan on the ros side. That is because the py_avoider code tells the program to subscribe to the /scan topic.
> source /opt/ros/jazzy/setup.bash
> ros2 run ros_gz_bridge parameter_bridge /lidar@sensor_msgs/msg/LaserScan[gz.msgs.LaserScan --ros-args -r /lidar:=/scan
Terminal 3: the Twist bridge from Ros to Gazebo.
> source /opt/ros/jazzy/setup.bash> ros2 run ros_gz_bridge parameter_bridge /cmd_vel@geometry_msgs/msg/Twist]gz.msgs.Twist
Terminal 4: Launch the robot controller
Notice that we need to source one additional setup file.
The first setup file handles everything needed by the overall Ros system
The second setup file adds in anything that is required by the custom code in py_avoider
Also note that when we launch the custom controller - we call it by the same name we used in the setup.py configuration file
Make sure that you are in the workspace root ~/ros2_avoider/> source /opt/ros/jazzy/setup.bash> source install/setup.bash> ros2 run py_avoider avoider
As soon as you launch the controller, the robot should start moving, straight ahead since the Lidar does not show any obstacle in range.
Once it gets close to the wall, the robot should turn counterclockwise until it is roughly parallel with the wall and start moving forward again.
When it gets to the upper left corner it should again turn counterclockwise until it is parallel with the left hand wall, and continue on its way.

Next Steps
Now, if you want to change and rerun your code it is pretty easy:
1) change the py_avoider controller code to do what you want
2) update any new dependencies that you might have added and re-run rosdep
3) run the colcon builder to package up the new code
4) run the new controller
Note: because of the distributed communications, you only need to shutdown the controller node. You can leave the simulation and both bridges running. Once you have the updated node ready, just relaunch the avoider in terminal 4. You don't need to re-source the setup.bash files unless you close the terminals.
What we did
This has been a long one, but we got a lot done:
We have:
1) Set up a ros workspace
2) added our custom robot controller software
3) configured the build instructions
4) built the new ros package
5) setup and ran the full simulation with the new controller
Next step - Expand your robot, add to your world!